Saturday 23 November 2013

Bumgenius Tutorial - changing velcro/aplix to snaps/poppers.

So, you've recently scored a bunch of cheap nappies from one of the many pre-loved cloth nappy pages, or have already used ones you've previously bought and used on another child. The velcro (otherwise known as Aplix or hook and loop tape) is starting to look worn and bobbly. Or maybe you've come up with another problem, like your baby has just learnt how to undo velcro, or you just don't like the stuff.

I personally, just don't like velcro on nappies. I find that it wears badly, and I can't stand it sticking to other things in the washing machine and making them bobbly. I find snaps (poppers) make for a much more secure fit.

And also, I'm slightly mad. So I decided to change my entire stash of Bumgenius v.4 pockets over to snaps. Some were already snaps, but I had around 12 to change. After all that changing, I thought a little tutorial would be handy for others who are looking to change their nappies over too, so here we are!

You will need....
- Scissors
- Seam ripper
- Paper or thin card
- Ruler
- Pen
- Pokey thing (I used a darning needle, some pliers come with a tool just for making holes)
- Snap press or pliers (I used a hand held one, around £12)
- Snaps! (I'm using KAM type plastic snaps, size 20). You need 24 caps, 20 'female' sockets and 4 'male' bits.
- Patience

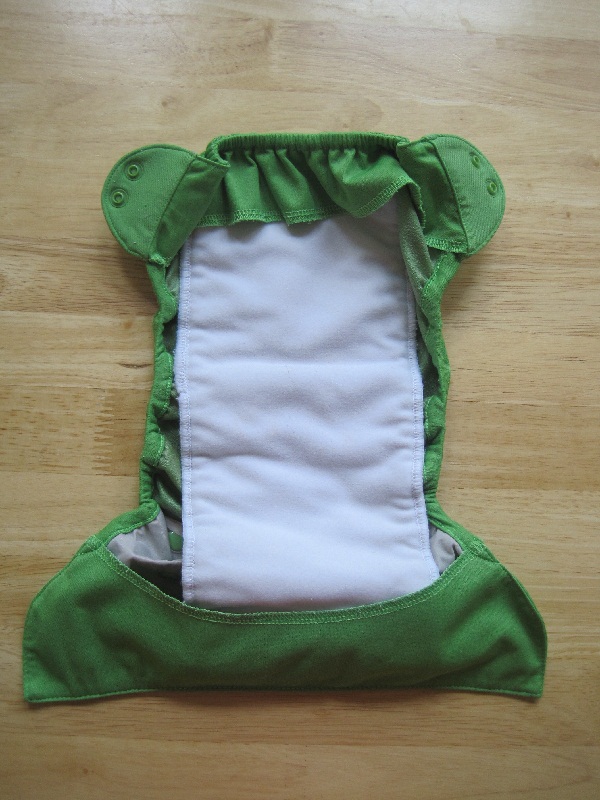
1. Look at your nappy. Pretty depressing. Let's get started on removing the old worn velcro.


2.  We'll start with the laundry tabs at the back. Simply lift the back flap of the pocket, and gently unpick the stitches using your trusty seam ripper.


3. To remove the wing velcro, I find it easiest to cut across (make sure not to cut the actual nappy) with some nice sharp scissors, and then unpick with the seam ripper.


4. Next is the waistband velcro. This needs to be done VERY VERY  gently, as you don't want to make any holes here. You can either attack it from the front, or fold the pocket inside out and go from inside. I use a bit of both. Take your time. 


5. Now we're going to make a template for the placement of the snaps. I'm using a Bumgenius v.4 pocket for my template. You could use another nappy that you like the fit of, or I have provided the measurements below. Bumgenius nappies have 2 rows of ten female snaps along the waistband and two vertically placed male snaps on each wing. Some people prefer using just one row of snaps, it's up to you!


6. Here is my template. It is 30cm long, and 6cm wide (there is no need to taper the edges like I have done, I just like being fancy is all!). You need two horizontal lines going all the way across, one 2.5cm from the top, and another 5cm from the top. Fold your strip of paper exactly in half. From this middle line measure 1.25cm to the right and mark with a small dot. From this dot, mark out four more dots with 2.5cm in between. Do the same on both lines, for both sides, making sure the four middle dots measure 1.25cm from the middle line. You should end up with ten dots on each line, 2.5cm apart. I made mine into little crosses so I could see them easier. Hope that makes sense...if it doesn't, please let me know!


7. Using your poking tool (knitting/darning needle in my case) poke a hole through each cross. 


8. Right. Using the center rise snap as a guide, place your template on top of the nappy. Make sure the top edge of the template is flush against the top of the nappy and the middle line is in line with the center rise snap. Make sense so far? Using your pen, do a little dot through the pre-made hole. In this picture I'm using a biro, but I actually found a Sharpie or felt tip pen best. 


9. You'll be left with a series of dots along the nappy. Time for that handy poking tool again. Putting your hand with the needle INSIDE the actual pocket of the nappy, carefully locate the dot from the inside and push out. It is important to make sure you are only going through the waterproof fabric and not the stay-dry lining. You can do all twenty dots at once, or do each one after you've placed each snap. Up to you.


10. It's Snappy Happy time! These are your snaps. Far left are CAPS. Middle is FEMALE. Far right is MALE. This is how I will be referring to them from now on. You need a cap for each male and female part. So for this nappy, you will need twenty four caps, twenty females and four males.


11. Grab a cap. Putting your hand inside the pocket again, locate the hole you just made with your needle, and push the cap through.


12. Place a female on top of this cap, press it down slightly. You may want to trim the cap at this point, because if the prong is too long, it will not set in properly and it won't snap. Simply take your nice sharp scissors, lay them flat across the female, and snip off the very tip of the prong.


13. Get your handy snap pliers, make sure the cap is sitting nicely in the bottom hole, line up and press. Remember the flat side of the cap is inside the pocket, so there is the layer of stay dry fabric between the pliers and the cap (I do advise practising on something else first if you've got spare snaps).


14. TA DA!!! You did now. Now do the other 19.


15. Time for the wing snaps. I did these completely by eye, so have no measurements for you. It is pretty easy though. The hard bit is getting the needle through the fabric! Two caps, and two males on each side.


And that is it. Here's a load I did. You can do it in loads of different ways - match the snap colour to the nappy, use different colours, I even mixed up the caps and females for my Eiffel Tower (black and white Chelsea Perry print) to create a black and white spotty look. The red has exact matching colour snaps, the blue and pink have alternate rows of different colours, and the cream has loads of different coloured pastel snaps.


There will be teeny holes where you removed the velcro. I found that after a couple of washes these have mostly disappeared. 

I got my pliers and KAM snaps from The Little Fabric Bazaar on Facebook. She has the vast majority of colours to match your nappies, and is the only place I could find that sells snaps in packs of 20. Very fast and fantastic service!


Tuesday 17 September 2013

50 Hexipuffs!

50 Hexipuffs.


I've got quite a nice little pile of hexipuffs now. 50 of them. I've used up all of the odds and ends of scrap yarn I had lying around. Sometimes I feel like I'll be knitting these for the rest of my life.

Tuesday 13 August 2013

A Bag for Yarn

I has a poblem.


A pile of yarn with no home and two pairs of old trousers.

I has a solution.

A brilliant free tutorial from Film In The Fridge. I added some handles, because I like handles. I watched Harry Potter and the Goblet of Fire (for the first time!) while making this, so I guess it took around two hours from start to finish. I may have done it in under just an hour if my sewing machine hadn't suddenly decided to go tension-crazy on me. 
'Tis done now though. And my yarn is much happier.


Sunday 11 August 2013

Hexipuffs are the stuff of dreams

40 Hexipuffs.


These little buggers are addictive. I can knit, stuff and sew one in about 30 minutes. 

Thursday 8 August 2013

Thirty Dirty Hexipuffs

30 Hexipuffs. 


Thanks to Ellie for sending me the lovely orange and blue sock yarns you can see here.


Monday 5 August 2013

Tuesday 2 July 2013

Flip Nappy Repair

In this post, I'll be showing you how to replace the elastic in your Bumgenius Flip nappy. I've only shown the leg casing here, but the back elastic is pretty straightforward and done the same way as the back elastic repair on the Bumgenius Organic.

You will need:

  1. A Flip nappy cover
  2. Scissors
  3. A sewing machine (you could probably hand sew this, but I prefer my machine)
  4. Seam ripper
  5. A few pins
  6. A small safety pin
  7. Elastic, 6mm or 1/4 inch in width, 4.5 inches long (1 piece for each leg and the back)
  8. Polyester thread matching the existing thread.
  9. Nap time

1 - Using your wiley fingers, feel along the leg opening for the end of the elastic. It will feel like a little bump within the leg casing itself.


2 - Using the seam ripper, and being very careful not to rip the fabric, take out a few of the stitches. I find it easiest to rip out at least 1-2 inches worth of stitches. Repeat at both ends.


3 - Ta-dah, you have discovered where the original elastic is attached. Remove this using your seam ripper, or cut as close as you can to the end of the elastic, leaving a little stump. Get rid of that old loose elastic.


4 - Pin your small safety pin to the end of the new elastic and thread through the leg casing.


5 - Pin at one end only to keep the elastic in place.


6 - Stick under your sewing machine foot, turn the wheel to push the needle through the elastic and PUL, then remove the pin. This is quite tricky to do, and you may find it easier to release more stitches from the leg casing. With lots of swearing, get it into place, and sew back and forth over the end 4 or 5 times to secure. Repeat at the other end.


7 - Now you're ready to sew the leg casing back into place. Checking both sides are in the correct postion, pin and sew. Pull fairly tight as you sew, and try not to sew over the elastic now hidden inside. Remember to overlap your new stitching with the old to make sure it doesn't unravel. Repeat at the other end (I don't know why this picture is the wrong way round).


Yay, All Done!!


And for comparison, here's just one side of my Moonbeam Flip fixed. See how bad the elastic was?


Identify your Bumgenius

There are several different styles of Bumgenius nappies out there - here I'm going to show you the different types, and try to quickly summarise how they work. There's also a quick colour and print guide at the bottom, in case you're a nutter like me, and just HAVE to have one of each colour! Yes, I am that sad.

*****

So, we start with the classic Bumgenius Pocket. Otherwise known as the version 4, or v4 (or course, there has also been the v3,v2 and v1 - but they're basically all the same, just slightly modified as the years have gone on). This is a Birth-to-Potty nappy, lined with a stay-dry fleece. These come with two inserts made from microfibre. One is 'newborn' size, and one is adjustable in size using poppers. The newborn insert can be used later on as a booster. The inserts are inserted (duh) into the pocket using the flap at the back of the nappy. Pop an insert in, and you're good to go.


*****

Second up, we've got the Organic, sometimes referred to as the 'Old/Original Elemental' or OBGE. As far as I can tell, the same design was called Elemental in the States and Organic here in the UK, but now there is the 'New Elemental', which confuses things a little. There is a layer of organic cotton covering the PUL, then two layers of organic cotton sewn in as inserts. This is an All-In-One nappy, meaning that you don't need anything extra, just stick it on the baby and go. These are Birth-to-Potty.


*****

Elemental are re-designed Organics. The layer of cotton that covers the PUL has been removed, and instead the two sewn in inserts of organic cotton are wider (in order to stop the PUL touching baby's skin). Again, these are an All-in-One nappy, but can be easily boosted by placing a booster of your choosing underneath the two attached inserts. These are Birth-to-Potty. Often referred to as 'New Elemental' or NBGE.


In the side view above you can see the two seperate layers of organic cotton. The right picture shows how it can be folded for a smaller baby.


These two pictures show that the inner layers can be folded towards the front or middle, depending on whether you have a boy or girl. A big thank you to Melissa for providing these pictures!


*****

Freetime is another All-in-One option. This time, there are two inserts, one attached at the front, the other attached at the back, both made of microfibre with a stay-dry top (keeping baby's bum dry). They also have a layer of fabric underneath these inserts, keeping the PUL from touching baby's skin, in a similar way to the Organics. These are Birth-to-Potty.

(pictures to come)


*****
The Flip nappy system is a PUL cover that can be used with either a stay-dry insert or an organic cotton pre-fold. There are also disposable inserts available. The cover can be used to cover most nappies (including fitteds or any insert you fancy). It's very versatile. The flaps at the front and back keep the insert in place, it's easy to boost and when used with the stay-dry insert, very trim! Again, they are Birth-to-Potty, fitting a wide range of babies.


*****

Bumgenius nappies also come in Newborn. This is a very small nappy, designed to fit a baby weighing 6-12lbs. They are an All-In-One design, and require no stuffing or folding. Therefore, great for those first weeks when the last thing you want to be doing is folding nappies! They can't be boosted, so need frequent changing. When Bumgenius used to make sized nappies, the Newborn was referred to as the Extra Small or XS

*****

BG Sized Nappies  are now quite hard to get hold of, as they no longer make them. They come in four sizes - Xtra Small, Small, Medium and Large. They are essentially an AIO style. There's a pocket in the back, where the inner permanent microfibre insert is, and extra boosters can be added as needed.


*****

Flip Trainers
(coming soon)
*****

Econobum
(coming soon)

*****


Bumgenius Organic Repair

I've been using cloth nappies for the Squid for a year now, and really loving it. I recently bought four Bumgenius Organics (or old style Elementals) for cheap, as the elastic was very slack. I set about repairing them, and am very please with the finished results. Thought I'd share how I did it, for other parents out there who want their nappies to last a little longer.

Here's a good comparison shot - the blue nappy (left) has had the elastic repaired, the black one (right) has not. The difference is pretty clear!


Here's another comparison, with the bigger one on top :

For this repair you will need:
  1. A Bumgenius Organic (also referred to as an 'old' Elemental)
  2. Scissors
  3. Seam ripper
  4. Sewing machine with straight stitch and zig-zag stitch functions
  5. Three pieces of elastic, 6mm wide (1/4 inch), 4.5 inches long
  6. Small safety pins
  7. Thread in white and something the matches the threads on the outside of your nappy
  8. A wee bit of patience
We will be replacing the leg elastic, the back waist elastic, and also separating the soakers/inserts at the front for easier folding and quicker drying.

1 - Open the nappy along the front, above where the poppers are (or velcro, if it's got velcro). Open it enough to fit your hand in, about 3-4 inches. Turn the nappy inside out.


2 - Using the seam ripper, take off both leg elastics. The stitches are very small, so take your time and make sure not to rip the PUL (waterproof outer layer). Take note of where the original elastic is attached (in line with the second row of rise poppers). You can use a safety pin to mark.


3 - I found that because of the way the elastic is attached and the nappy sewn, some of it is hard to remove without hurting the PUL.

4 - If you find this, just cut the elastic, leaving a small stub at the end (this also gives you a good stop and start point for exactly where the elastic should be attached).


5 - Attach new elastic. Use a straight stitch first to secure it, then switch to a zig-zag. Pull the elastic taut as you sew. You should find it fits exactly when pulled tight. Start at the rise popper end, PUL side up, and sew it directly onto the serged edging. Here, I've used black so it shows up better, but it doesn't really matter as it's on the inside. Repeat for both legs.


6 - Now onto the back waist elastic. Feel along the edge of the nappy to find a little lump, this is where the elastic is attached. If you're lucky, a bit of elastic may be poking out.


7 - Using the seam ripper, open up where the elastic is attached, about 7 stitches or so. Do the same at both ends.


8 - Using a small safety pin, attach the new elastic to the old at one end, then unpick the old elastic at that same end. At the other end, pull the old elastic through the casing and the new elastic should come with it. Attach the new at both ends with a safety pin, and then using straight stitch, sew the ends to the nappy. Again, be mindful of sewing it onto the serged edging.


9 - Turn the nappy outside in, and sew around the space where the back elastic is attached. This is a little tricky (and a bit hard to explain!). Basically, just follow the original stitching to replace what you unpicked earlier.


Now, if you don't want to remove the front end of the insert, skip ahead to step 14. I would recommend doing it though. It will help your nappy dry quicker, makes it easier to fold when the nappy is on the smaller rise settings and also makes it easier to boost.

10 - Turn the nappy inside out again, and find where the insert is attached at the FRONT of the nappy. 


11 - Using your seam ripper, unpick all the stitches until you have remove the small rectangle of fabric. Get rid of that little rectangle of fabric, and try to remove as many bits of thread as you can


12 - Turn the nappy right side out again. In some of the nappies, the inserts are sewn together at the front end, so unpick this. 


13 - Here are the two inserts detached from the front, showing how much easier they are to fold now. It will leave holes, but I've found that with a few washes these holes close up and they make no difference to the performance of the nappy while being worn.


14 - Now with your nappy turned right side out, all that's left to do is use a straight stitch to close up the front hole (yes, I have a pink sewing machine, because I am awesome).


And that's you all done! Here's the finished nappy, being compared with the blue one, and the old elastic compared with the new, big difference huh?


People have asked me before about holes in their Bumgenius Organic nappies, holes that have appeared in the cotton layer that covers the PUL. These holes are fine to leave, you can repair them by hand-sewing or patching them - but really, they are just cosmetic and don't affect the nappy's performance. 
I've also been asked about 'wicking' that can occur with this style of nappy (where the wee leaks through the leg holes onto clothes). This is easily avoided by making sure all the cotton is tucked in around the leg opening, you should not be able to see any cotton on the outside when the baby is wearing the nappy.

I was going to round this post off with a cute Squid in fluff picture, but he moves too fast!